Adding Diagrams to a Report Module
AsBuiltReport.Diagram is an optional PowerShell module that provides infrastructure diagram generation capabilities for AsBuiltReport report modules. It wraps the PSGraph module — a PowerShell DSL for Graphviz — and adds icon support, HTML node tables, subgraph containers, watermarks, themed styling, and direct integration with the PScribo document framework.
Diagrams are generated in memory as base64-encoded images and embedded into the report using PScribo's Image cmdlet. They can also be exported to disk as standalone files (PNG, SVG, PDF) alongside the report.
Prerequisite Reading
This guide assumes you are already familiar with creating AsBuiltReport report modules. If not, read the Creating a Report Module guide first.
Reference Implementation
For a complete, production-ready example of diagram implementation, see the AsBuiltReport.System.Resources repository. This project includes:
Src/Private/Diagram/Export-AbrDiagram.ps1— Orchestration functionSrc/Private/Diagram/Get-AbrProcessDiagram.ps1— Diagram builder functionIcons/— directory with 100×150 PNG icon files
This reference implementation demonstrates all patterns discussed in this guide.
Prerequisites
System Requirements
- PowerShell 5.1 or later (Windows) or PowerShell 7+ (Linux/macOS)
- PSGraph module (installs automatically with AsBuiltReport.Diagram)
- Graphviz (pre-installed on Windows, requires separate installation on Linux/macOS)
PSGraph
AsBuiltReport.Diagram requires the PSGraph module. Install it from the PowerShell Gallery:
Graphviz
On Windows, Graphviz is bundled with AsBuiltReport.Diagram and requires no separate installation. On Linux and macOS, install Graphviz using your package manager:
Installation
Install AsBuiltReport.Diagram from the PowerShell Gallery:
Declaring the Dependency
Add AsBuiltReport.Diagram to the RequiredModules array in your module manifest (.psd1):
RequiredModules = @(
    @{
        ModuleName    = 'AsBuiltReport.Core'
        ModuleVersion = '1.6.4'
    }
    @{
        ModuleName    = 'PSGraph'
        ModuleVersion = '2.1.38.27'
    }
    @{
        ModuleName    = 'AsBuiltReport.Diagram'
        ModuleVersion = '1.0.7'
    }
)
JSON Configuration
Diagrams are controlled by Options keys in the report JSON configuration file rather than InfoLevel, since diagrams represent an optional capability rather than a depth-of-detail setting. Add the following keys to the Options section of your module's JSON template:
{
    "Options": {
        "EnableDiagrams": true,
        "EnableDiagramDebug": false,
        "EnableDiagramMainLogo": false,
        "DiagramTheme": "White",
        "DiagramWaterMark": "",
        "ExportDiagrams": false,
        "ExportDiagramsFormat": [
            "png"
        ],
        "EnableDiagramSignature": false,
        "DiagramColumnSize": 4,
        "SignatureAuthorName": "",
        "SignatureCompanyName": ""
    },
}
| Key | Type | Default | Description |
|---|---|---|---|
EnableDiagrams |
Boolean | false |
Embed diagram images in the report |
ExportDiagrams |
Boolean | false |
Export standalone diagram files alongside the report |
ExportDiagramsFormat |
Array | ["png"] |
Standalone export formats: pdf, png, svg, jpg |
DiagramTheme |
String | "White" |
Diagram colour theme: White, Black, or Neon |
DiagramWaterMark |
String | "" |
Optional watermark text (e.g. "CONFIDENTIAL") |
EnableDiagramSignature |
Boolean | false |
Add footer signature with author and company name |
EnableDiagramDebug |
Boolean | false |
Render diagrams in draft mode (placeholders instead of icons) for faster iteration during development |
SignatureAuthorName |
String | "" |
Author name for diagram footer signature (if EnableDiagramSignature is true) |
SignatureCompanyName |
String | "" |
Company name for diagram footer signature (if EnableDiagramSignature is true) |
EnableDiagramMainLogo |
Boolean | false |
Display main logo in diagrams |
How Diagrams Are Embedded
Diagrams are generated in base64 format, which returns the diagram as a base64-encoded string rather than writing a file to disk. This string is embedded into the report using PScribo's Image cmdlet. When ExportDiagrams is enabled, the diagram is also saved to disk in the requested format(s) before the base64 pass.
The Get-BestImageAspectRatio function (provided by AsBuiltReport.Diagram) calculates the optimal width and height to fit the diagram within your target bounds while preserving the original aspect ratio.
Diagram Generation Flow
The diagram generation follows this sequence:
- Collect infrastructure data — Gather system information (processes, servers, networks, etc.)
- Build PSGraph structure — Assemble nodes, edges, and subgraphs using the PSGraph DSL
- Export standalone files (if enabled) — Call
New-AbrDiagramwith file formats (pdf,png,svg) - Generate base64 for embedding — Call
New-AbrDiagramagain with-Format base64for the report
try {
    $DiagramObj = Get-AbrInfrastructureDiagram -Format base64 -Direction $Options.DiagramDirection -DraftMode:$Options.EnableDiagramDebug
    $Diagram = New-AbrDiagram @DiagramParams -InputObject $Graph
    if ($Diagram) {
        $BestAspectRatio = Get-BestImageAspectRatio -GraphObj $Diagram -MaxWidth 600 -MaxHeight 600
        PageBreak
        Section -Style Heading3 $MainDiagramLabel {
            Image -Base64 $Diagram -Text "$MainDiagramLabel Diagram" -Width $BestAspectRatio.Width -Height $BestAspectRatio.Height -Align Center
        }
    }
} catch {
    Write-PScriboMessage -IsWarning -Message "Unable to generate the $MainDiagramLabel Diagram: $($_.Exception.Message)"
}
Export Diagrams Pattern
When ExportDiagrams is enabled, New-AbrDiagram is called twice: once with file formats to export to disk, then again with -Format base64 to embed in the report. This allows both standalone exports and report embedding in a single orchestration function.
Note
PageBreak is called before the diagram Section, so the diagram occupies its own page in Word output. Omit PageBreak if you prefer the diagram to flow inline with surrounding content.
Repository Structure for Diagrams
Diagram functions are kept in a dedicated subfolder under Src/Private/ to separate diagram-generation code from report-section code:
AsBuiltReport.Vendor.Technology/
└── Src/
    ├── Private/
    │   ├── Diagram/
    │   │   ├── Export-AbrDiagram.ps1          # Diagram orchestration & export function
    │   │   └── Get-Abr[Vendor]Diagram.ps1     # PSGraph node/edge assembly
    │   └── Get-Abr[VendorAbr][Resource].ps1   # Report section functions
    └── Public/
        └── Invoke-AsBuiltReport.Vendor.Technology.ps1
Separation of Concerns
Get-AbrVendorDiagram.ps1— Builds the PSGraph structure (SubGraph,nodes,edges). Returns the graph object.Export-AbrDiagram.ps1— Orchestration function. Takes the graph object, applies theme/formatting, handles file export, and returns base64 for embedding.
This separation allows each function to have a single responsibility: the diagram builder focuses on data collection and graph topology, while the export function handles rendering configuration and output formats. See the AsBuiltReport.System.Resources repository for a complete production-ready reference.
Building a Diagram
Icon Mapping
Diagrams use PNG icons to represent infrastructure components. Define a $script:Images hashtable that maps semantic names to icon filenames. The icon files must exist in the path passed to New-AbrDiagram via -IconPath.
$script:Images = @{
    'AsBuiltReport_LOGO' = 'AsBuiltReport_Logo.png'
    'AsBuiltReport_Signature' = 'AsBuiltReport_Signature.png'
    'Abr_LOGO_Footer' = 'AsBuiltReport.png'
    'Process' = 'Process.png'
}
Using $script: scope makes the hashtable available to all private diagram functions called from the main diagram assembly without passing it as a parameter.
Graph Structure
PSGraph uses scriptblocks to define the diagram hierarchy. Node and edge default attributes — shape, font, colour — are declared once at the top of the Graph {} block and inherited by all nodes and edges unless overridden.
Note
New-AbrDiagram handles the Graph section internally, so you only need to build the inner structure (nodes, edges, subgraphs) in your diagram builder function. The orchestration function will pass the resulting graph object to New-AbrDiagram for rendering. This section is for demonstration purposes to show how to set graph-level defaults.
$DiagramGraph = Graph -Name 'VendorTechnology' -Attributes @{
    pad        = 1.0
    rankdir    = 'TB'          # TB = top-to-bottom; LR = left-to-right
    splines    = 'polyline'
    penwidth   = 1.5
    fontname   = 'Segoe Ui Black'
    fontcolor  = '#565656'
    fontsize   = 32
    style      = 'dashed'
    labelloc   = 't'
    imagepath  = $IconPath
    nodesep    = 0.60
    ranksep    = 0.75
    bgcolor    = 'White'
} {
    # Default attributes for all nodes
    Node @{
        shape     = 'none'
        labelloc  = 't'
        style     = 'filled'
        fillColor = 'transparent'
        fontsize  = 14
        imagescale = $true
    }

    # Default attributes for all edges
    Edge @{
        style     = 'dashed'
        dir       = 'both'
        arrowtail = 'dot'
        color     = '#71797E'
        penwidth  = 2
        arrowsize = 1
    }

    SubGraph MainGraph -Attributes @{
        Label   = ''
        penwidth = 0
        bgcolor = 'transparent'
    } {
        # Nodes and edges go here
    }
}
Adding Individual Nodes
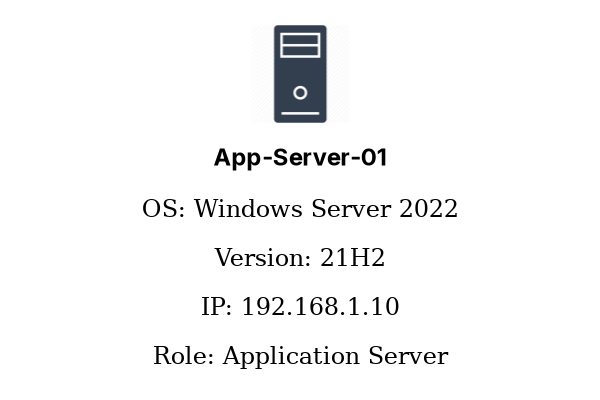
Use Add-NodeIcon to create a node with an icon and optional metadata table beneath it.
$ServerInfo = [PSCustomObject][ordered]@{
    'OS'      = 'Windows Server 2022'
    'Version' = '21H2'
    'IP'      = '192.168.1.10'
    'Role'    = 'Application Server'
}

Add-NodeIcon `
    -Name 'App-Server-01' `
    -IconType 'Server' `
    -AditionalInfo $ServerInfo `
    -ImagesObj $script:Images `
    -Align 'Center' `
    -FontSize 16 `
    -DraftMode:$DraftMode
    -NodeObject
Example of a Node with an Icon
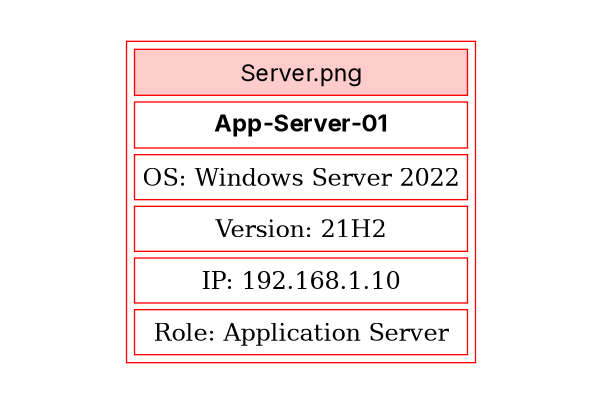
The -DraftMode switch renders placeholder boxes instead of real icons during development, making it faster to iterate on layout without needing all icon files in place.
Example of a Node in Draft Mode
Adding Server Farms and Collections
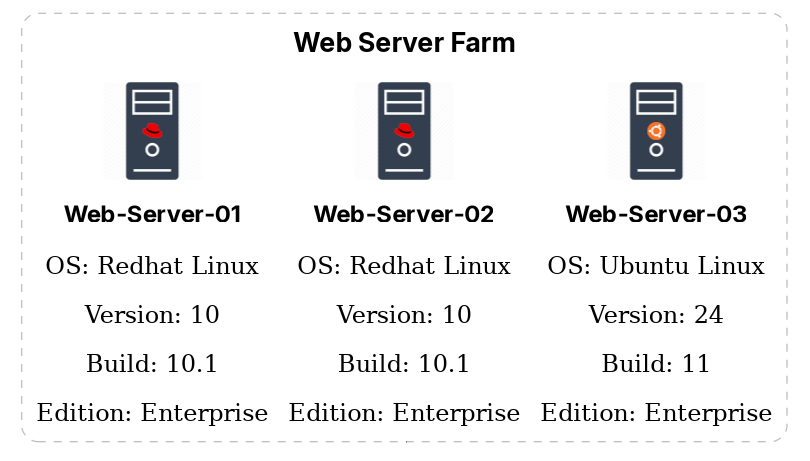
Use Add-HtmlNodeTable when you want to display a group of similar objects (e.g. a proxy server farm, a repository list) in a multi-column grid with a subgraph border around them.
$ProxyServers = @(
    @{
        Name           = 'proxy-01.example.com'
        AdditionalInfo = [PSCustomObject][ordered]@{
            'OS'   = 'Windows Server 2022'
            'Mode' = 'Automatic'
            'IP'   = '192.168.1.20'
        }
    },
    @{
        Name           = 'proxy-02.example.com'
        AdditionalInfo = [PSCustomObject][ordered]@{
            'OS'   = 'Windows Server 2022'
            'Mode' = 'Manual'
            'IP'   = '192.168.1.21'
        }
    }
)

Add-HtmlNodeTable `
    -Name 'ProxyFarm' `
    -ImagesObj $script:Images `
    -InputObject $ProxyServers.Name `
    -IconType 'Server' `
    -ColumnSize 3 `
    -AditionalInfo $ProxyServers.AdditionalInfo `
    -Subgraph `
    -SubgraphLabel 'Proxy Servers' `
    -SubgraphLabelPos 'top' `
    -SubgraphTableStyle 'dashed,rounded' `
    -TableBorderColor '#71797E' `
    -TableBorder '1' `
    -SubgraphLabelFontSize 18 `
    -FontSize 14 `
    -FontBold `
    -SubgraphFontBold `
    -DraftMode:$DraftMode `
    -NodeObject
Example of a Server Farm Node
Connecting Nodes
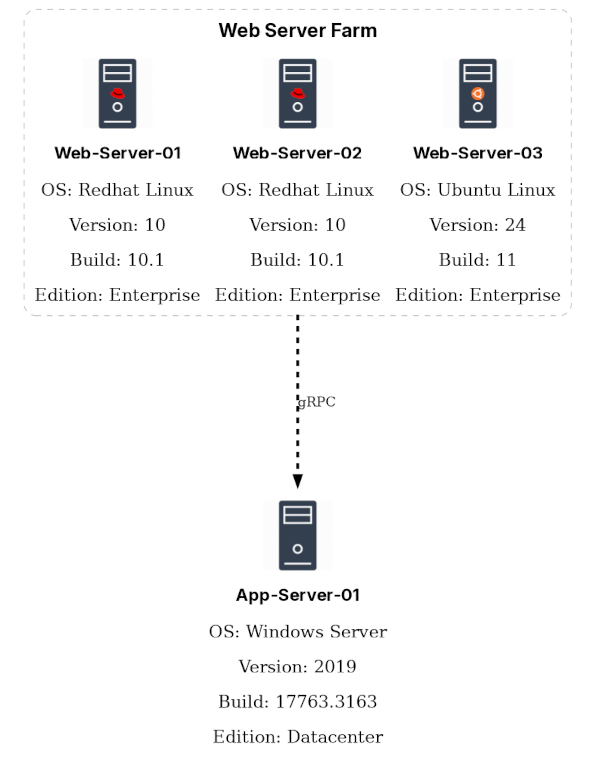
Use Add-NodeEdge to draw labelled connections between nodes:
Add-NodeEdge `
    -From 'AppServer01' `
    -To 'ProxyFarm' `
    -EdgeLabel 'HTTPS' `
    -EdgeColor '#71797E' `
    -EdgeLabelFontSize 12 `
    -EdgeLabelFontColor '#565656'
Example of Connected Nodes
Controlling Layout
Use Rank to force nodes onto the same horizontal level:
# Force all proxy nodes to render at the same vertical position
Rank 'proxy-01.example.com', 'proxy-02.example.com', 'proxy-03.example.com'
Grouping with SubGraph
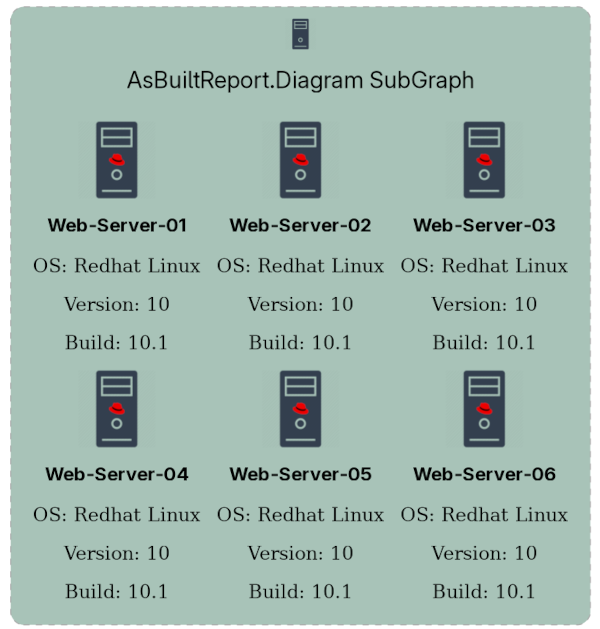
Use Add-HtmlSubGraph group related nodes together under a shared border and label. This is ideal for server farms, application tiers, or any logical grouping of components. The subgraph acts as a container that visually separates its child nodes from the rest of the diagram.
$WebServerFarm = @(
    @{
        Name = 'Web-Server-01';
        AdditionalInfo = [PSCustomObject][ordered]@{
            'OS' = 'Redhat Linux'
            'Version' = '10'
            'Build' = '10.1'
        }
        IconType = 'ServerRedhat'
    },
    @{
        Name = 'Web-Server-02';
        AdditionalInfo = [PSCustomObject][ordered]@{
            'OS' = 'Redhat Linux'
            'Version' = '10'
            'Build' = '10.1'
        }
        IconType = 'ServerRedhat'
    },
    @{
        Name = 'Web-Server-03';
        AdditionalInfo = [PSCustomObject][ordered]@{
            'OS' = 'Redhat Linux'
            'Version' = '10'
            'Build' = '10.1'
        }
        IconType = 'ServerRedhat'
    },
    @{
        Name = 'Web-Server-04';
        AdditionalInfo = [PSCustomObject][ordered]@{
            'OS' = 'Redhat Linux'
            'Version' = '10'
            'Build' = '10.1'
        }
        IconType = 'ServerRedhat'
    }, @{
        Name = 'Web-Server-05';
        AdditionalInfo = [PSCustomObject][ordered]@{
            'OS' = 'Redhat Linux'
            'Version' = '10'
            'Build' = '10.1'
        }
        IconType = 'ServerRedhat'
    },
    @{
        Name = 'Web-Server-06';
        AdditionalInfo = [PSCustomObject][ordered]@{
            'OS' = 'Redhat Linux'
            'Version' = '10'
            'Build' = '10.1'
        }
        IconType = 'ServerRedhat'
    }
)

$WebLabel = Add-HtmlNodeTable -Name 'WebLabel' -ImagesObj $Images -inputObject $WebServerFarm.Name -iconType $WebServerFarm.IconType -ColumnSize 3 -AditionalInfo $WebServerFarm.AdditionalInfo -MultiIcon -DraftMode:$DraftMode -FontSize 18 -TableBackgroundColor '#a8c3b8ff' -CellBackgroundColor '#a8c3b8ff'

Add-HtmlSubGraph -Name 'USA-WebServers' -ImagesObj $Images -TableArray $WebLabel -Align 'Center' -Label 'AsBuiltReport.Diagram SubGraph' -LabelPos 'top' -TableStyle 'dashed,rounded' -TableBorderColor 'darkgray' -TableBorder '1' -ColumnSize 1 -FontSize 22 -DraftMode:$DraftMode -TableBackgroundColor '#a8c3b8ff' -IconType 'Server' -NodeObject
Example of a SubGraph Grouping Multiple Nodes
Generating the Diagram
Once the PSGraph structure is assembled, pass it to New-AbrDiagram to render the output:
New-AbrDiagram `
    -InputObject $DiagramGraph `
    -OutputFolderPath $OutputFolderPath `
    -Filename 'VendorTechnology-Infrastructure' `
    -Format @('base64') `
    -MainDiagramLabel 'Vendor Technology Infrastructure' `
    -IconPath $IconPath `
    -ImagesObj $script:Images `
    -LogoName 'Main_Logo' `
    -Direction 'top-to-bottom' `
    -MainGraphBGColor $MainGraphBGColor `
    -Fontcolor $Fontcolor `
    -Fontname 'Segoe Ui Black'
To also export standalone files alongside the base64 output, pass additional formats:
New-AbrDiagram `
    -InputObject $DiagramGraph `
    -OutputFolderPath $OutputFolderPath `
    -Filename 'VendorTechnology-Infrastructure' `
    -Format @('base64', 'pdf', 'png') `
    -MainDiagramLabel 'Vendor Technology Infrastructure' `
    -IconPath $IconPath `
    -ImagesObj $script:Images `
    -LogoName 'Main_Logo'
Example of a Generated Diagram
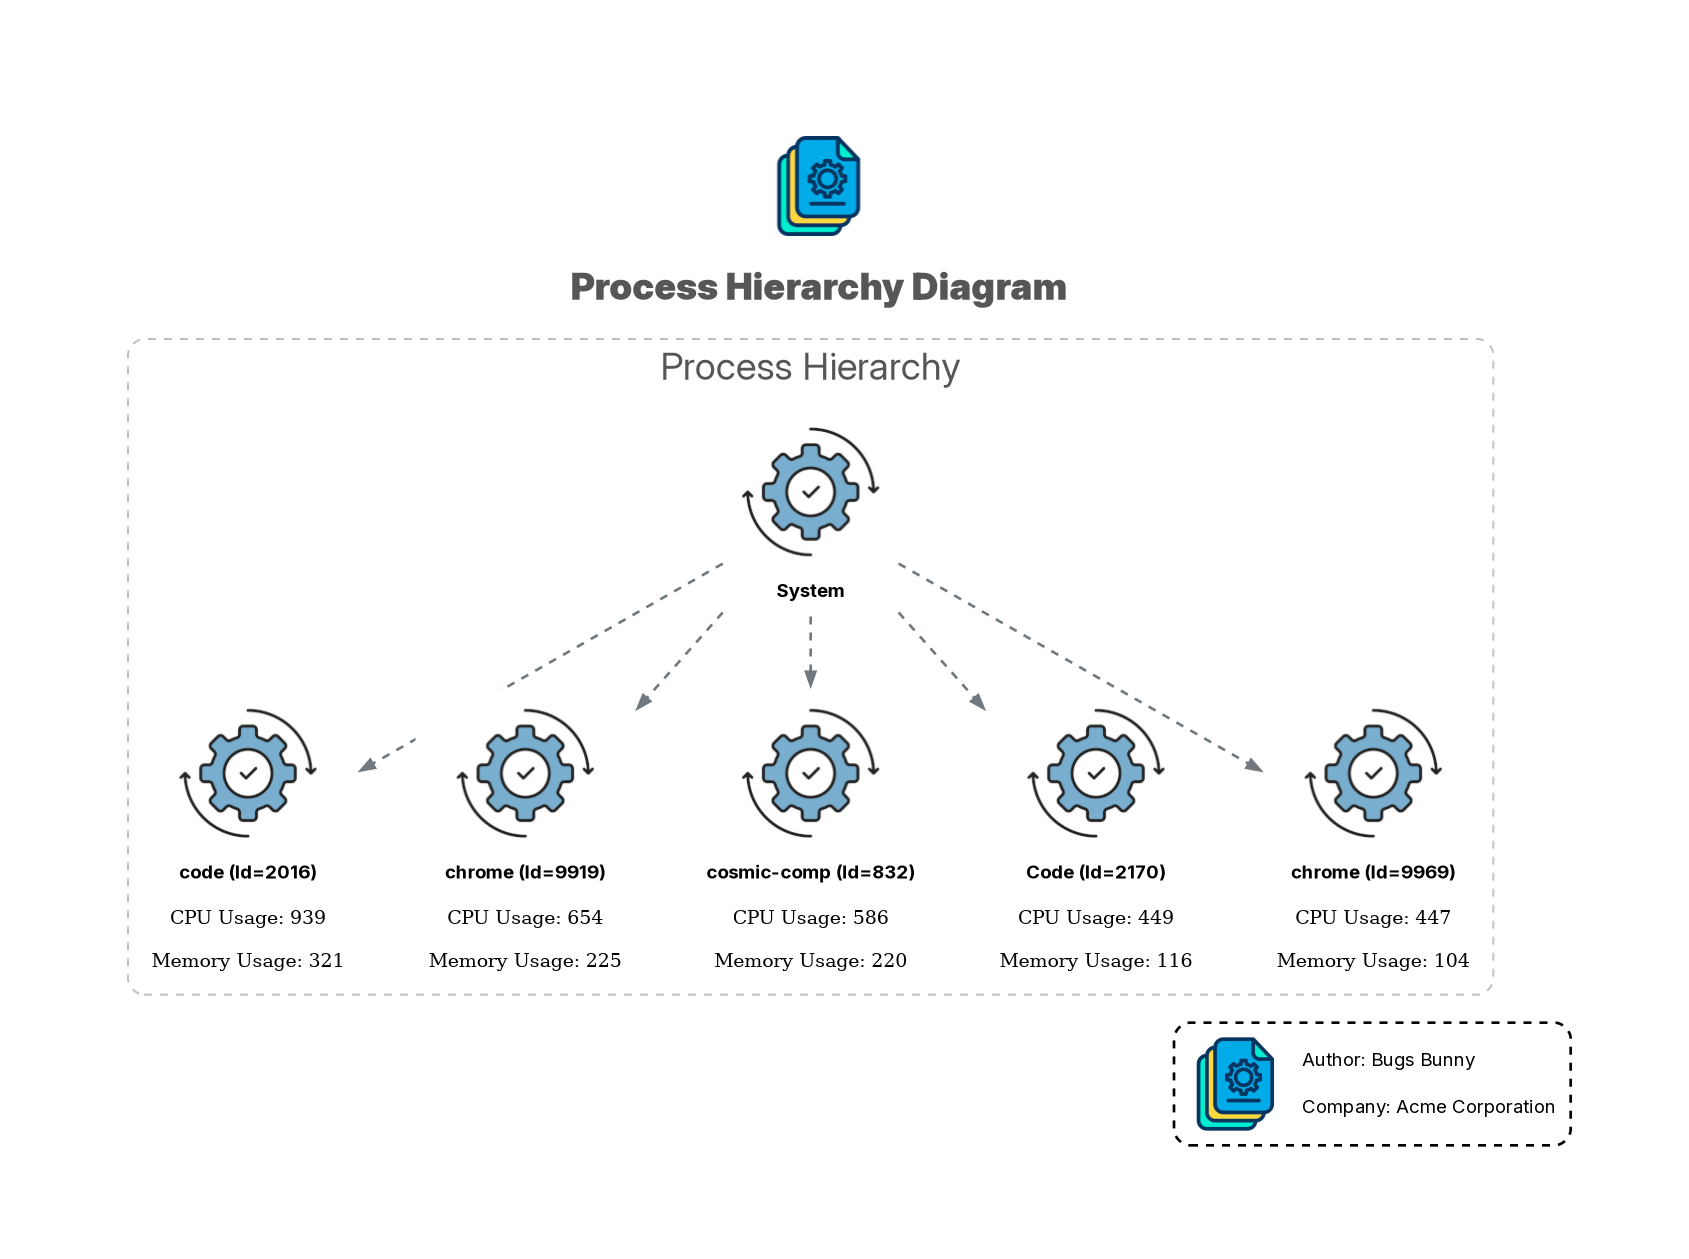
Diagram Themes
AsBuiltReport.Diagram supports three built-in colour themes. Themes control the visual appearance of diagrams and should be applied consistently throughout your diagram functions.
Theme Application
Define theme colours in the begin block of your diagram builder function, then use those variables throughout the graph assembly. This ensures theme changes propagate consistently:
if ($Options.DiagramTheme -eq 'Black') {
    $Edgecolor = 'White'
    $Fontcolor = 'White'
    $NodeFontcolor = 'White'
} elseif ($Options.DiagramTheme -eq 'Neon') {
    $Edgecolor = 'gold2'
    $Fontcolor = 'gold2'
    $NodeFontcolor = 'gold2'
} else {
    # White theme (default)
    $Edgecolor = '#71797E'
    $Fontcolor = '#565656'
    $NodeFontcolor = '#565656'
}
Theme Usage in New-AbrDiagram
The orchestration function (Export-AbrDiagram) applies additional theme-specific parameters to New-AbrDiagram:
switch ($Options.DiagramTheme) {
    'Black' {
        $DiagramParams.add('MainGraphBGColor', 'Black')
        $DiagramParams.add('Edgecolor', 'White')
        $DiagramParams.add('Fontcolor', 'White')
        $DiagramParams.add('NodeFontcolor', 'White')
        $DiagramParams.add('WaterMarkColor', 'White')
    }
    'Neon' {
        $DiagramParams.add('MainGraphBGColor', 'grey14')
        $DiagramParams.add('Edgecolor', 'gold2')
        $DiagramParams.add('Fontcolor', 'gold2')
        $DiagramParams.add('NodeFontcolor', 'gold2')
        $DiagramParams.add('WaterMarkColor', '#FFD700')
    }
    default {
        $DiagramParams.add('WaterMarkColor', '#333333')
    }
}
Theme Details
| Theme | Background | Font Colour | Edge Colour | Use Case |
|---|---|---|---|---|
| White | White | Dark grey (#565656) | Dark grey (#71797E) | Default; works well in printed documents |
| Black | Black | White | White | Dark mode; suitable for presentations |
| Neon | Dark grey (grey14) | Gold (gold2) | Gold (gold2) | High contrast; good for visibility |
Watermarks and Signatures
New-AbrDiagram supports optional watermarks and footer signatures:
New-AbrDiagram `
    -InputObject $DiagramGraph `
    -Format @('png') `
    -OutputFolderPath $OutputFolderPath `
    # Watermark
    -WaterMarkText $Options.DiagramWaterMark `
    -WaterMarkColor 'Gray' `
    -WaterMarkFontOpacity 0.3 `
    # Footer signature
    -Signature `
    -AuthorName 'Tim Carman' `
    -CompanyName 'Contoso'
Complete Private Function Example
Reference Implementation Source
The example functions below are from the AsBuiltReport.System.Resources repository. These are production-ready implementations that demonstrate all the patterns and best practices discussed in this guide.
View the full source code:
1. Diagram Builder Function (Get-AbrProcessDiagram)
The diagram builder function collects infrastructure data and assembles the PSGraph structure. It reads from script-scoped variables ($Options, $reportTranslate, $Images) set by the AsBuiltReport framework.
Key responsibilities:
- Collect data from the target system
- Apply theme-specific colours
- Build nodes and edges
- Handle debug styling
- Return the PSGraph object
function Get-AbrProcessDiagram {
    <#
    .SYNOPSIS
        Used by As Built Report to build a process hierarchy diagram.
    .DESCRIPTION
        Builds a Graphviz-based process hierarchy diagram showing the top 5 CPU-consuming
        processes and their relationship to the host system. The diagram is constructed using
        the AsBuiltReport.Diagram module's PSGraph DSL (SubGraph, Add-DiaNodeIcon, Edge).

        The diagram structure:
            - A single SubGraph named 'ProcessH' acts as the cluster container.
            - A 'System' node represents the host machine.
            - Five process nodes (one per top-5 process) show CPU and Memory usage as
              additional node attributes.
            - Dashed edges connect the 'System' node to each process node.

        Colour and style are determined by the DiagramTheme option:
            Black  - Dark background, white labels and edges.
            Neon   - Dark grey background, gold labels and edges.
            White  - Default; light-coloured edges and labels.

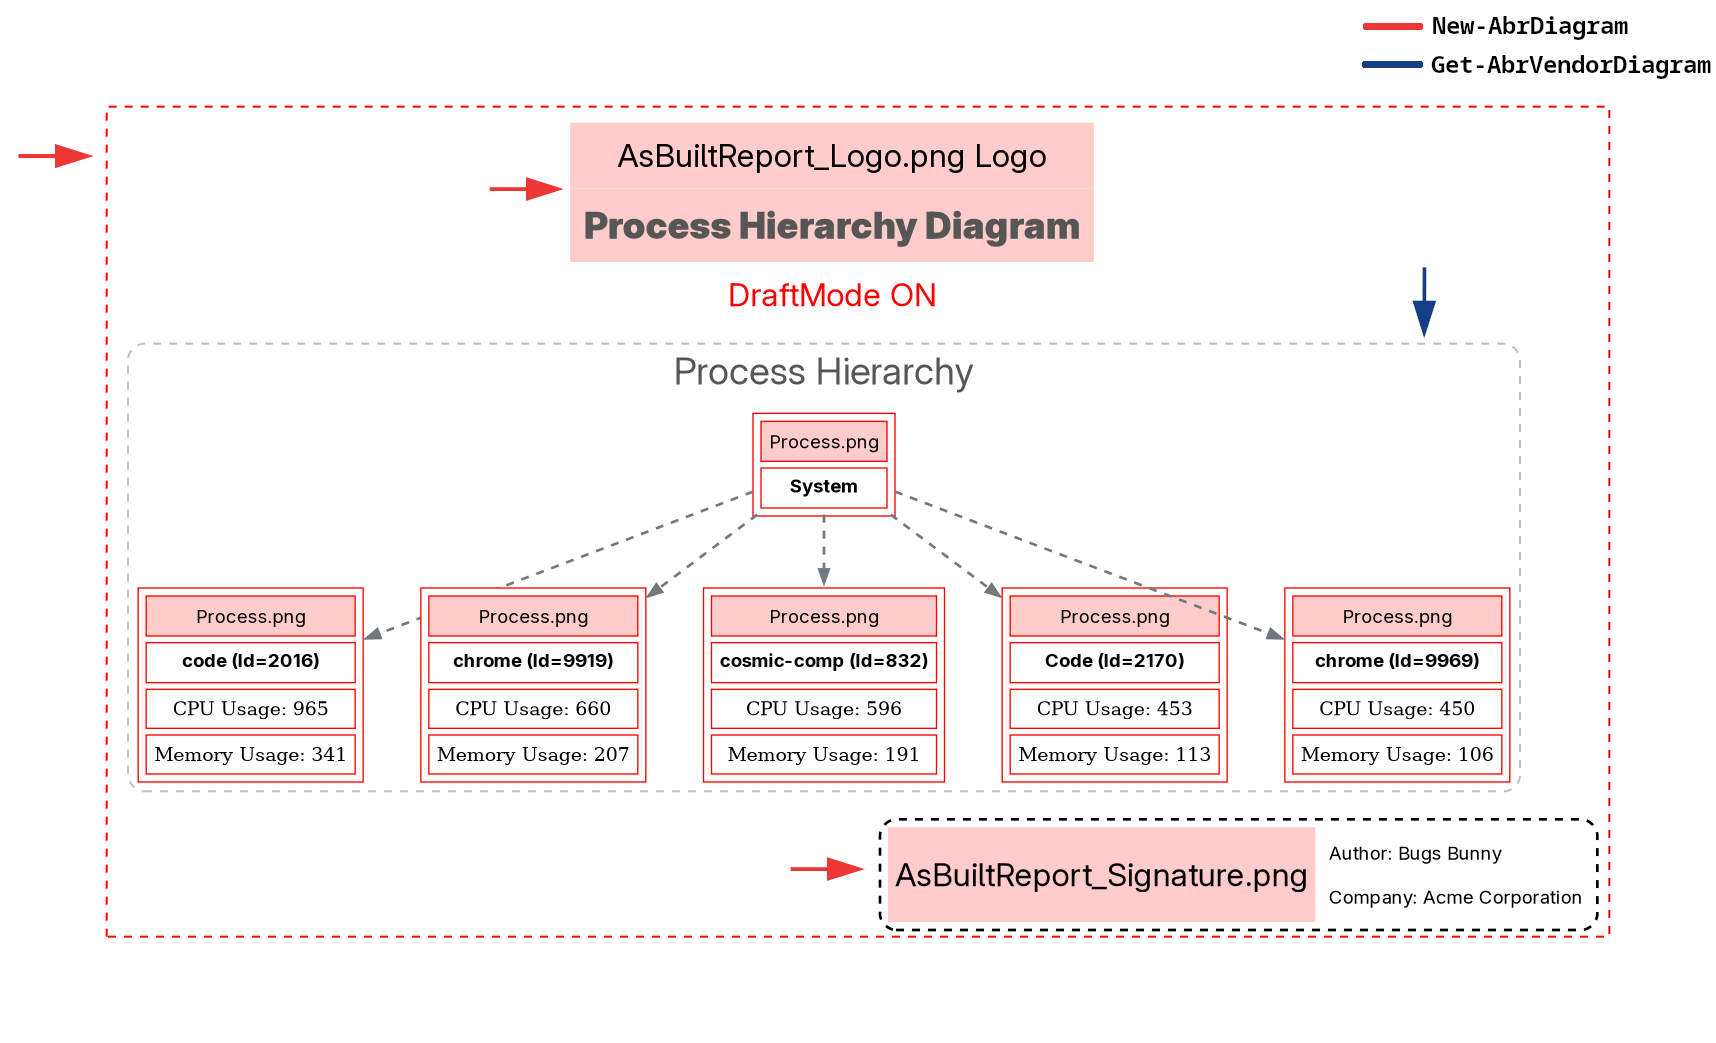
        When EnableDiagramDebug is true, debug styling (red dashed borders, visible edges)
        is applied to all graph elements to help troubleshoot layout issues.

        This function returns the resulting Graphviz graph object, which is then passed to
        Export-AbrDiagram for rendering and embedding into the report.
    .INPUTS
        None. This function does not accept pipeline input. It reads from script-scoped
        variables ($Options, $reportTranslate, $Images) that are set by the AsBuiltReport
        framework before this function is called.
    .OUTPUTS
        System.Object
        Returns the Graphviz SubGraph object produced by the PSGraph DSL. The caller
        (Get-AbrProcessInfo) passes this object to Export-AbrDiagram for rendering.
    .EXAMPLE
        # This function is called automatically by Get-AbrProcessInfo.
        # It is not designed to be called directly by end users.
        $diagram = Get-AbrProcessDiagram
        Export-AbrDiagram -DiagramObject $diagram -MainDiagramLabel 'Process Hierarchy Diagram' -FileName 'ProcessDiagram'
    .NOTES
        Version:        0.1.3
        Author:         AsBuiltReport Community
        Twitter:        @AsBuiltReport
        Github:         AsBuiltReport
    .LINK
        https://github.com/AsBuiltReport/AsBuiltReport.System.Resources
    #>
    [CmdletBinding()]
    param (
    )

    begin {
        Write-PScriboMessage ($($reportTranslate.InfoLevel) -f 'ProcessInfo', $($InfoLevel.ProcessInfo))
        Write-PScriboMessage $($reportTranslate.Generating)
        # Configure debug styling when EnableDiagramDebug is enabled. In debug mode, edges and
        # subgraph borders are drawn in red so layout issues are easy to spot. In normal mode,
        # these elements are made invisible (style = 'invis') so they do not appear in the
        # final diagram output.
        if ($Options.EnableDiagramDebug) {
            $EdgeDebug = @{style = 'filled'; color = 'red' }
            $SubGraphDebug = @{style = 'dashed'; color = 'red' }
            $NodeDebug = @{color = 'black'; style = 'red'; shape = 'plain' }
            $NodeDebugEdge = @{color = 'black'; style = 'red'; shape = 'plain' }
            $IconDebug = $true
        } else {
            $EdgeDebug = @{style = 'invis'; color = 'red' }
            $SubGraphDebug = @{style = 'invis'; color = 'gray' }
            $NodeDebug = @{color = 'transparent'; style = 'transparent'; shape = 'point' }
            $NodeDebugEdge = @{color = 'transparent'; style = 'transparent'; shape = 'none' }
            $IconDebug = $false
        }

        # Set the edge and font colours based on the chosen diagram theme.
        if ($Options.DiagramTheme -eq 'Black') {
            $Edgecolor = 'White'
            $Fontcolor = 'White'
        } elseif ($Options.DiagramTheme -eq 'Neon') {
            $Edgecolor = 'gold2'
            $Fontcolor = 'gold2'
        } else {
            $Edgecolor = '#71797E'
            $Fontcolor = '#565656'
        }
    }

    process {
        try {
            # Retrieve the top 5 CPU-consuming processes and project the properties needed for
            # diagram node labels. CPU time is rounded to whole seconds; memory is in MB.
            $Process = Get-Process | Sort-Object -Property CPU -Descending | Select-Object -Property @{Name = 'Name'; Expression = { "$($_.Name.Split(' ')[0]) (Id=$($_.Id))" } }, @{Name = 'CPU'; Expression = { try { [math]::Round($_.CPU, 0) } catch { '--' } } }, @{Name = 'MEM'; Expression = { try { [math]::Round($_.WorkingSet / 1MB, 0) } catch { '--' } } } -First 5

            # SubGraph is a Graphviz element that groups related nodes inside a bordered cluster.
            # Here the cluster contains the System node and the top 5 process nodes.
            # Attributes control the cluster border style, label, font, and colour.
            SubGraph ProcessH -Attributes @{Label = $($reportTranslate.Label); fontsize = 28; fontcolor = $Fontcolor; penwidth = 1.5; labelloc = 't'; style = 'dashed,rounded'; color = 'gray' } {

                # Add the System node to the diagram. Add-DiaNodeIcon is a helper from the
                # AsBuiltReport.Diagram module that renders a node with an icon image sourced
                # from the $Images hashtable.
                Add-NodeIcon -Name 'System' -IconDebug $IconDebug -IconType 'Process' -ImagesObj $Images -NodeObject

                # Add one node per top-5 process. Each node shows the process name (including PID)
                # as well as additional info attributes for CPU and Memory usage.
                $Process | ForEach-Object { Add-NodeIcon -Name $_.Name -IconDebug $IconDebug -IconType 'Process' -ImagesObj $Images -NodeObject -AditionalInfo @{'CPU Usage' = $_.CPU; 'Memory Usage' = $_.MEM } }

                # Draw a dashed edge from the System node to each process node to represent the
                # parent-child relationship. Edge colour and width follow the active theme.
                $Process | ForEach-Object { Add-NodeEdge -From 'System' -To $_.Name -EdgeStyle 'dashed' -EdgeColor $Edgecolor -EdgeThickness 2 }
            }
        } catch {
            Write-PScriboMessage -IsWarning $_.Exception.Message
        }
    }

    end {}
}
2. Diagram Orchestration Function (Export-AbrDiagram)
The orchestration function handles rendering configuration, theme application, file export, and report embedding. This function acts as the integration point between the diagram builder and the report generation framework.
Key responsibilities:
- Apply theme-specific colours and styles
- Configure icon path resolution
- Handle file export when enabled
- Generate base64 for report embedding
- Manage watermarks and signatures
- Provide error handling and logging
The orchestration function reads these $Options keys:
| Option | Type | Purpose |
|---|---|---|
EnableDiagrams |
Boolean | Master switch; when false, function exits immediately |
DiagramTheme |
String | 'White', 'Black', or 'Neon' for color scheme |
ExportDiagrams |
Boolean | Save diagram files to disk |
ExportDiagramsFormat |
Array | Formats to export: ['png'], ['pdf', 'svg'], etc. |
EnableDiagramDebug |
Boolean | Render with debug styling (red borders, visible edges) |
EnableDiagramSignature |
Boolean | Add author/company footer |
SignatureAuthorName |
String | Author name for signature |
SignatureCompanyName |
String | Company name for signature |
EnableDiagramMainLogo |
Boolean | Show main logo in diagram |
DiagramWaterMark |
String | Text watermark to overlay |
Export Flow with Format Handling:
When ExportDiagrams is true:
- Build the
$DiagramParamshashtable with theme colours - Add the requested export formats to
$DiagramParams['Format'] - Call
New-AbrDiagramto export files to$OutputFolderPath - Remove the format from
$DiagramParamsand set it to'base64' - Call
New-AbrDiagramagain to generate base64 for embedding
# First pass: export to disk (if enabled)
if ($Options.ExportDiagrams) {
    if (-not $Options.ExportDiagramsFormat) {
        $DiagramFormat = 'png'
    } else {
        $DiagramFormat = $Options.ExportDiagramsFormat
    }
    $DiagramParams.Add('Format', $DiagramFormat)

    try {
        $Graph = $DiagramObject
        $Diagram = New-AbrDiagram @DiagramParams -InputObject $Graph
        if ($Diagram) {
            foreach ($OutputFormat in $DiagramFormat) {
                Write-Information -MessageData "Saved '$($FileName).$($OutputFormat)' to '$($OutputFolderPath)'" -InformationAction Continue
            }
        }
    } catch {
        Write-PScriboMessage -IsWarning "Unable to export diagram: $($_.Exception.Message)"
    }
}

# Second pass: always render as base64 for embedding
try {
    $DiagramParams.Remove('Format')
    $DiagramParams.Add('Format', 'base64')

    $Graph = $DiagramObject
    $Diagram = New-AbrDiagram @DiagramParams -InputObject $Graph
    if ($Diagram) {
        $BestAspectRatio = Get-BestImageAspectRatio -GraphObj $Diagram -MaxWidth 600 -MaxHeight 600
        PageBreak
        Section -Style Heading3 $MainDiagramLabel {
            Image -Base64 $Diagram -Text "$MainDiagramLabel Diagram" -Width $BestAspectRatio.Width -Height $BestAspectRatio.Height -Align Center
        }
    }
} catch {
    Write-PScriboMessage -IsWarning "Unable to generate diagram: $($_.Exception.Message)"
}
Two-Pass Rendering Pattern
This dual-pass approach (export first, then base64) ensures:
- Consistency: Same rendering engine for both outputs
- Efficiency: Graphviz rendering is only done once per format
- Flexibility: Users can export standalone files and embed in reports simultaneously
Integrating with Report Section Functions
Diagram builder functions are called from report section functions (e.g., Get-AbrProcessInfo). The report section function calls Export-AbrDiagram to handle rendering:
function Get-AbrProcessInfo {
    # ... gather process data and system information ...

    # Build the diagram structure
    $diagram = Get-AbrProcessDiagram

    # Export and embed the diagram in the report
    Export-AbrDiagram -DiagramObject $diagram `
                      -MainDiagramLabel 'Process Hierarchy' `
                      -FileName 'ProcessHierarchy'
}
In your main Invoke-AsBuiltReport.* function, call the diagram function and embed the result immediately before the main report sections:
foreach ($System in $Target) {
    try {
        $script:Connection = Connect-VendorSystem -Server $System -Credential $Credential -ErrorAction Stop
        $script:OutputFolderPath = $OutputFolderPath

        Section -Style Heading1 $System {
            # Diagram section (before all data sections)
            if ($Options.EnableDiagrams) {
                try {
                    # Get the diagram structure from the builder function
                    $diagram = Get-AbrProcessDiagram

                    # Call Export-AbrDiagram to handle rendering and embedding
                    Export-AbrDiagram -DiagramObject $diagram `
                                      -MainDiagramLabel 'Process Hierarchy Diagram' `
                                      -FileName 'ProcessHierarchy'
                } catch {
                    Write-PScriboMessage -IsWarning "Process Diagram: $($_.Exception.Message)"
                }
            }

            # Data sections follow
            Get-AbrProcessInfo
            Get-AbrSystemInfo
        }
    } catch {
        Write-PScriboMessage -IsWarning ($LocalizedData.ConnectionError -f $System, $_.Exception.Message)
    }
}
Script-Scoped Variables
Diagram builder functions read from script-scoped variables set by the AsBuiltReport framework and report section functions. These variables must be set before calling the diagram builder:
| Variable | Type | Set By | Purpose |
|---|---|---|---|
$script:Options |
PSCustomObject | Report config | Diagram configuration (themes, export, debug, etc.) |
$script:OutputFolderPath |
String | Main function | Directory for file exports |
$script:Images |
Hashtable | Module initialization | Maps semantic icon names to filenames |
$script:reportTranslate |
PSCustomObject | Framework | Localized strings |
$script:Connection |
Object | Main function | Connection to target system |
$script:InfoLevel |
PSCustomObject | Framework | Detail level for each section |
Example: Setting script-scoped variables in the main function
function Invoke-AsBuiltReportVendorTechnology {
    param (
        [String[]] $Target,
        [PSCredential] $Credential,
        [String] $OutputFolderPath = (Get-Location).Path
    )

    # Initialize the Images hashtable
    $script:Images = @{
        'AsBuiltReport_LOGO' = 'AsBuiltReport_Logo.png'
        'AsBuiltReport_Signature' = 'AsBuiltReport_Signature.png'
        'Process' = 'Process.png'
        'Server' = 'Server.png'
    }

    # Set the output folder for exports
    $script:OutputFolderPath = $OutputFolderPath

    foreach ($System in $Target) {
        # Connect and set connection variable
        $script:Connection = Connect-VendorSystem -Server $System -Credential $Credential

        # Now diagram functions can read $script:Connection, $script:Options, $script:OutputFolderPath, $script:Images
    }
}
Localising Diagram Section Titles
Store diagram section headings and Image alt-text in your module's language file alongside other translated strings:
InvokeAsBuiltReportVendorTechnology = ConvertFrom-StringData @'
    Connecting                    = Connecting to {0}.
    ConnectionError               = Failed to connect to {0}: {1}
    InfrastructureDiagram         = Infrastructure Diagram
    InfrastructureDiagramAltText  = Vendor Technology infrastructure topology diagram
    NetworkDiagram                = Network Diagram
    NetworkDiagramAltText         = Vendor Technology network topology diagram
'@
if ($Options.EnableDiagrams -and $Graph) {
    Section -Style Heading2 $LocalizedData.InfrastructureDiagram {
        Image -Base64 $Graph `
              -Text $LocalizedData.InfrastructureDiagramAltText `
              -Align Center `
              -Width $BestAspectRatio.Width `
              -Height $BestAspectRatio.Height
        PageBreak
    }
}
What is handled by New-AbrDiagram
The New-AbrDiagram handles the Main logo, label, watermark and signature rendering, as well as applying theme colours and exporting to multiple formats. This allows your diagram builder function to focus solely on assembling the PSGraph structure (nodes, edges, subgraphs) without needing to manage rendering details.
Reference Implementations
For additional guidance and working examples, refer to the following production-ready repositories:
AsBuiltReport.System.Resources
The AsBuiltReport.System.Resources repository is the primary reference implementation for diagram functionality.
Key Files:
-
Src/Private/Diagram/Export-AbrDiagram.ps1- Complete orchestration function
- Dual-pass rendering implementation
- Theme application pattern
- File export handling
-
Src/Private/Diagram/Get-AbrProcessDiagram.ps1- Diagram builder function
- Data collection and assembly
- Theme color handling
- Debug mode styling
What to Study:
- How themes are applied at both the builder and orchestration layers
- Icon path resolution from module root
- Two-pass rendering for export + embedding
- Error handling with graceful degradation
- Script-scoped variable usage
- SubGraph grouping and node creation
Directory Structure:
AsBuiltReport.System.Resources/
├── Icons/                           # 100×150 PNG files
│   ├── Process.png
│   ├── AsBuiltReport_Logo.png
│   └── AsBuiltReport_Signature.png
├── Src/
│   ├── Private/
│   │   ├── Diagram/
│   │   │   ├── Export-AbrDiagram.ps1
│   │   │   └── Get-AbrProcessDiagram.ps1
│   │   ├── Get-AbrProcessInfo.ps1
│   │   └── ...
│   └── Public/
│       └── Invoke-AsBuiltReport.ps1
└── AsBuiltReport.System.Resources.psd1
Getting Started with Reference Code
-
Clone the repository:
-
Study the diagram functions:
- Open
Src/Private/Diagram/Get-AbrProcessDiagram.ps1to understand diagram assembly - Open
Src/Private/Diagram/Export-AbrDiagram.ps1to understand orchestration - Compare against the examples in this guide
- Open
-
Review the Icons directory:
- Examine icon sizes and formats
- Note the naming convention for icon files
- See how the
$Imageshashtable maps names to filenames
-
Trace the calling pattern:
- Find where
Get-AbrProcessDiagramis called - Follow how
Export-AbrDiagramis invoked - Understand how
$script:variables are initialized
- Find where
-
Adapt the patterns to your module:
- Create your own
Get-AbrYourModuleDiagram.ps1function - Adapt
Export-AbrDiagram.ps1for your specific needs - Collect your own icons or use the same set
- Create your own
Common Parameters Reference
New-AbrDiagram
| Parameter | Type | Description |
|---|---|---|
-InputObject |
PSGraph object | The assembled Graph {} scriptblock result |
-Format |
String[] | Output formats: pdf, svg, png, jpg, dot, base64 |
-OutputFolderPath |
DirectoryInfo | Folder for file-based output formats |
-Filename |
String | Base filename (without extension) |
-MainDiagramLabel |
String | Title displayed at the top of the diagram |
-IconPath |
String | Directory containing icon PNG files |
-ImagesObj |
Hashtable | Maps icon names to filenames in -IconPath |
-LogoName |
String | Key from -ImagesObj to use as the header logo |
-Direction |
String | top-to-bottom or left-to-right |
-MainGraphBGColor |
String | Background colour (named or hex) |
-Fontcolor |
String | Default font colour |
-Fontname |
String | Font family (e.g. Segoe Ui Black) |
-WaterMarkText |
String | Watermark text |
-WaterMarkColor |
String | Watermark colour |
-WaterMarkFontOpacity |
Double | Watermark opacity (0.0–1.0) |
-Signature |
Switch | Add footer signature |
-AuthorName |
String | Signature author name |
-CompanyName |
String | Signature company name |
-DraftMode |
Switch | Render placeholder boxes instead of icons |
Add-NodeIcon
| Parameter | Type | Description |
|---|---|---|
-Name |
String | Display label for the node |
-IconType |
String | Key from -ImagesObj for the icon |
-ImagesObj |
Hashtable | Icon name-to-filename mapping |
-AditionalInfo |
PSCustomObject | Properties to display below the icon |
-Align |
String | Text alignment: Left, Center, Right |
-FontSize |
Int | Label font size |
-DraftMode |
Switch | Render placeholder instead of icon |
Add-HtmlNodeTable
| Parameter | Type | Description |
|---|---|---|
-Name |
String | Internal node name |
-ImagesObj |
Hashtable | Icon name-to-filename mapping |
-InputObject |
String[] | Node display names |
-IconType |
String | Icon key for all nodes (or array for -MultiIcon) |
-ColumnSize |
Int | Number of columns in the node grid |
-AditionalInfo |
PSCustomObject[] | Per-node property objects |
-Subgraph |
Switch | Wrap nodes in a labelled border |
-SubgraphLabel |
String | Subgraph border title |
-SubgraphTableStyle |
String | Border style: dashed,rounded, solid,rounded |
-MultiIcon |
Switch | Allow different icon types per node |
-NodeObject |
Switch | Return the node object for use in edges |
-DraftMode |
Switch | Render placeholders instead of icons |
Add-NodeEdge
| Parameter | Type | Description |
|---|---|---|
-From |
String | Source node name |
-To |
String | Target node name |
-EdgeLabel |
String | Label displayed on the connection |
-EdgeColor |
String | Line colour |
-EdgeLabelFontSize |
Int | Label font size |
-EdgeLabelFontColor |
String | Label font colour |
-EdgeStyle |
String | Line style: dashed, solid |
-EdgeThickness |
Int | Line width |
-Arrowhead |
String | Arrowhead style: normal, none |
Get-BestImageAspectRatio
| Parameter | Type | Description |
|---|---|---|
-GraphObj |
String | The base64 diagram string |
-MaxWidth |
Int | Maximum width in pixels |
-MaxHeight |
Int | Maximum height in pixels |
Returns a hashtable with Width and Height keys containing the optimal dimensions.
Summary of Best Practices
- Separate diagram code from report code — place diagram functions in
Src/Private/Diagram/so they are easy to locate and test independently. - Use the two-function pattern — separate the diagram builder (data collection + graph assembly) from the orchestration function (rendering + export). This ensures each function has a single responsibility.
- Guard with
$Options.EnableDiagrams— diagrams depend on Graphviz and are slow to generate; always make them opt-in and exit early if disabled. - Configure theme colours once in
begin{}— read$Options.DiagramThemeonce and store the resolved colours in variables, then use those throughout the graph assembly for consistency. - Enable debug mode during development — use
-EnableDiagramDebugto render red-bordered placeholder boxes instead of real icons during layout iteration. - Use the two-pass render pattern — when
ExportDiagramsis enabled, callNew-AbrDiagramfirst with file formats, then again with-Format base64for embedding. - Resolve icons relative to module root — use
Split-Path (Split-Path $PSScriptRoot -Parent) -Parentto find your module's root, then join toIcons/subdirectory. - Use
Get-BestImageAspectRatio— pass the base64 string through this function beforeImageso the diagram scales correctly in both HTML and Word output. - Call
PageBreakbeforeSection— this ensures the diagram occupies its own page in Word documents and does not push headings or tables off the page. - Use
$script:scope for shared state — use$script:Images,$script:Connection,$script:Options, and$script:OutputFolderPathto avoid passing large objects as parameters through multiple function calls. - Sanitise node names — Graphviz node names must not contain special characters. Use
-replace '[^a-zA-Z0-9]', ''on any strings used as node identifiers. - Handle errors gracefully — wrap diagram generation in try/catch blocks and log warnings instead of failing the report; diagrams are optional features.
- Localise section titles and alt-text — store diagram heading strings and
Imagealt-text in your language file alongside other translatable strings. - Provide a standalone export function — if your module has multiple diagram types, offer a public
Export-AsBuiltReport[Vendor]Diagramfunction for users who only want diagrams. - Test with DraftMode first — during development, use
-DraftMode:$trueto quickly iterate on layout without needing all icon files in place, then switch to real icons.
Troubleshooting
Graphviz Not Found
Error: The term 'dot.exe' (or 'dot') is not recognized as an internal or external command
Solution:
- On Windows, ensure PSGraph is installed. Graphviz is bundled. Try uninstalling and reinstalling PSGraph:
- On Linux/macOS, install Graphviz with your package manager (see Prerequisites section)
- Verify installation:
Icons Not Found
Error: The icon file 'Server.png' could not be found at path ...
Causes & Solutions:
- Icon files are not in the specified
-IconPathdirectory — verify icons exist and the path is correct: - Icon name in hashtable doesn't match filename — ensure
-ImagesObjkey matches the filename exactly (case-sensitive on Linux/macOS): - Icon path is relative but working directory is incorrect — use absolute paths or resolve relative to module root:
Diagram Won't Render or Appears Blank
Causes & Solutions:
- No nodes or edges defined — verify the PSGraph object is not empty:
- Invalid node or edge names — Graphviz requires valid identifiers. Sanitise all node names:
- Format not supported — verify the requested format is supported:
New-AbrDiagramfailed silently — always check the return value and examine Graphviz error log:
Diagram Takes Too Long to Generate
Cause: Large graphs with many nodes/edges or complex layout calculations
Solutions:
- Use draft mode during development to skip icon rendering:
- Simplify the graph — reduce the number of nodes or use simpler layouts:
- Disable diagram generation during testing — add
-EnableDiagrams $falseto your test JSON config
Report Embedding Issues (HTML/Word Output)
Diagram appears too small or distorted:
Solution: Use Get-BestImageAspectRatio to calculate optimal dimensions:
$BestAspectRatio = Get-BestImageAspectRatio -GraphObj $Diagram -MaxWidth 800 -MaxHeight 600
Image -Base64 $Diagram -Width $BestAspectRatio.Width -Height $BestAspectRatio.Height
Diagram layout breaks across pages in Word:
Solution: Add PageBreak before the diagram section:
PageBreak
Section -Style Heading3 'Infrastructure Diagram' {
    Image -Base64 $Diagram -Width $Width -Height $Height
}
Special Characters in Labels or Metadata
Error: Diagram fails when node labels contain special characters (<, >, ", &, etc.)
Solution: Escape HTML special characters or use quoted labels:
# Escape special characters
$Label = 'Server & Storage' -replace '&', '&'
$Label = 'Cost: $500' -replace '\$', '\$'

# Or use HTML encoding in metadata tables
$AdditionalInfo = @{
    'Cost' = '$500'
    'Status' = 'Active & Ready'
}
Theme Colour Not Applied
Cause: Theme variables are not propagated to all graph elements
Solution:
- Ensure theme colours are set before building the graph:
- Verify the orchestration function applies theme to
New-AbrDiagram:
Performance Issues with Export Diagrams
Dual-pass rendering (export + base64) is slow:
Optimisation:
- Only export when explicitly requested:
- Consider caching the Graphviz output if running multiple diagrams
Diagram Functions Not Found
Error: The term 'Add-NodeIcon' is not recognized
Solution:
- Ensure AsBuiltReport.Diagram module is imported:
- Verify the module is listed in
RequiredModulesin your module manifest (.psd1) - Check that the function name is correct — AsBuiltReport.Diagram uses
Add-NodeIcon(notNew-NodeIcon)
Still Stuck?
If you encounter issues not covered here:
-
Enable debug output:
-
Use DraftMode to isolate layout issues:
-
Examine the Graphviz DOT output:
-
Consult the reference implementation:
-
Open an issue on GitHub:
- AsBuiltReport.Diagram Issues
- Include your diagram builder function, the error message, and the input data that triggers the issue